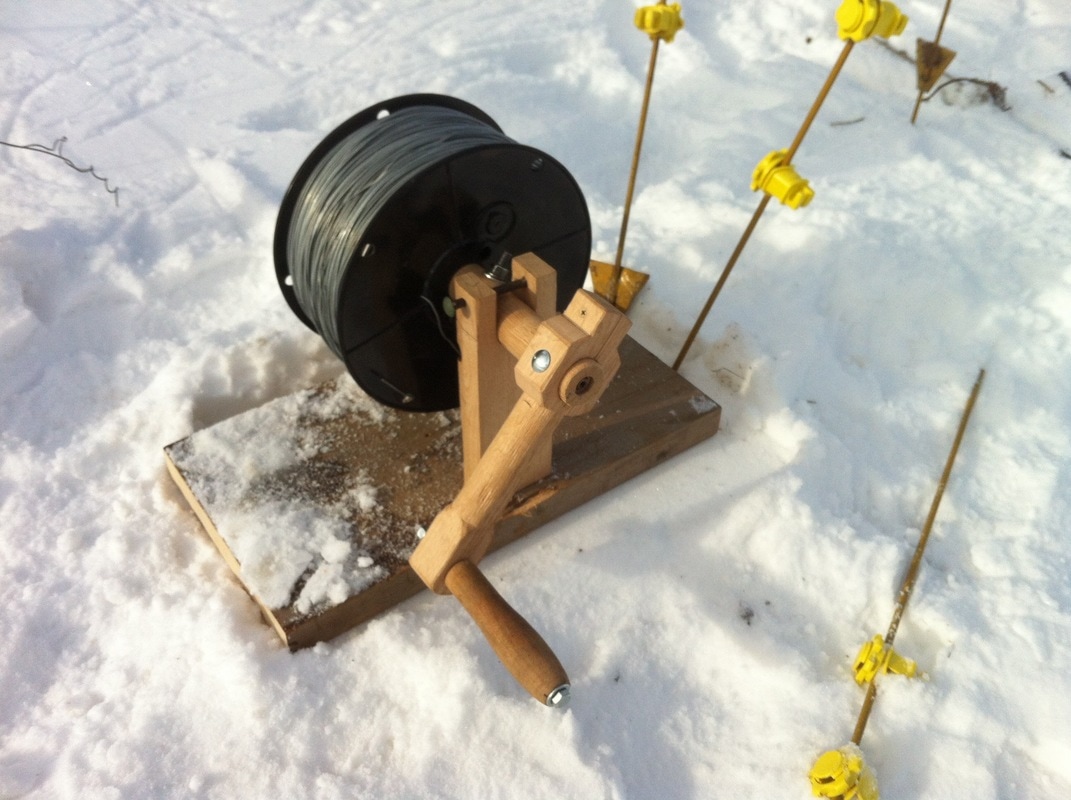
 I couldn’t raise pastured pork without electric fence. At least I couldn’t move pigs so frequently to fresh paddocks, which is healthier for the land and the pigs. I get the environmental benefit letting my animals graze and forage in rapid rotations without the overwhelming expense and labor of building permanent fence. A New Zealand inventor developed the first electric fence for livestock in the 1930’s, but it wasn’t until almost the 1970’s when more reliable energizers and adjustable post insulators came along that American farmers started using electric fences with any frequency. My earliest truck driving experience came thanks to electric fencing. When I was about eight, dad had me drive the truck as wire spooled off the back while he and a hired man walked along pulling posts off the bed and pounding them into the ground. For my own hogs, I started out using polywire—twisted nylon line with strands of stainless steel wire wrapped in it. Polywire’s light weight—6 lbs for 1/4 mile— makes it idea for subdividing paddocks for rotational grazing since the operator can easily roll up and pay out several hundred feet on small spools in a few minutes. Easy fence moving makes for easier pasture rotations, reducing the likelihood and negative effects of leaving pigs in one place too long. Good polywire (the cheap stuff barely works) costs about four times as much as 14 gauge steel wire per foot. When I realized that I needed more acres inside one perimeter—4 acres of pasture and 3 acres of woods—I switched to steel wire. Steel wire gives several more years of service life than poly wire and it’s recyclable in the end. It’ s just not as easy to handle. Setting up the fence itself wasn’t that hard, especially with another person helping. A simple wooden carrier made it fairly easy to string the wire. (Go Here for a picture of the carrier). I’m glad I put it up, but I didn’t look forward to taking it down. All the handling systems I’d seen for steel wire were vehicle-mounted and powered: gas-engine rigs on trailers behind 4-wheelers, power-take-off or hydraulic rollers mounted on tractors. I briefly toyed with the idea of making a powered wire roller for the BCS, but that would be far more effort and construction cost than the problem required. I needed to be able to roll wire back on to the plastic spools in 45lb, half-mile lengths. Spools any larger are a pain to carry in one hand. I Googled “wire roller,” “hand crank wire roller,” and “manual wire roller” for ideas. Most of the contraptions that came up were powered rollers or flimsy hand cranked rollers for polywire. And this packable, hand-cranked, barbed-wire roller for a mere $2,750. So I built my own. I have a lot more woodworking tools and wood on hand than I have metal fabrication tools and steel, so wood seemed like the better material choice. Before I got into hand-tool woodworking and interested in the devices people used before the internal combustion engine ruled agriculture, I viewed wooden mechanical contraptions as quaint and primitive. My roller is quaint and primitive, and that's just fine. The base needed to be wide enough to float over mud and snow. It’s a pine 2 x 12 offcut. The the rest of the parts came from one billet of oak. I do have some machines. I turned the shaft and handle on a 100 year old Oliver lathe that belonged to my wife’s grandfather. Making a wooden shaft meant that I could match the hole in the spools exactly. A steel rod threaded through the shaft and then bent parallel to it, fits though holes in the spool, making the spool turn with the shaft. I cut the crank arm out on a bandsaw. All the splitting, squaring, and cutting on the oak uprights was done with hand tools. The uprights join the base with a wedged mortise and tenon. No nails, no screws, no angle bracing needed. I finished rolling up wire yesterday. Before the ground was frozen, I pulled all my posts up a few inches so I’d be able to get them out later. For me, working on the snow is an advantage. I can haul a couple hundred pounds of posts, wire, and tools in an ice-fishing sled across smooth snow much more easily than I can move that same load over rough ground with a cart. The roller can pull 1/2 mile of wire around two corners. I don’t have to pull straight lines form post to post. I unhook the wire from the end post, pull it off all the insulators along the way, and make sure the wire passes around the outsides of corner posts so it stays in the path and doesn’t get hung up coming across the field or in the woods. I tie an 18” length of heavy chain to the far end of the wire so it stays tensioned instead of curling up and kinking while I pull it. The drag of the chain keeps the resistance even in the cranking but doesn’t get snagged on things. I pulled a mile of wire around the pastures and 3/4 of a mile through the woods. Good tool. Easy to make. I texted a picture of it to another hog farmer. “That’s awesome. You should patent that thing.” “You can’t patent Roman technology,” I sent back. But it still works pretty well.
0 Comments
I found out last week that I’ve been nominated for the Family Farm Defenders’ John Kinsman Beginning Farmer Food Sovereignty Prize.
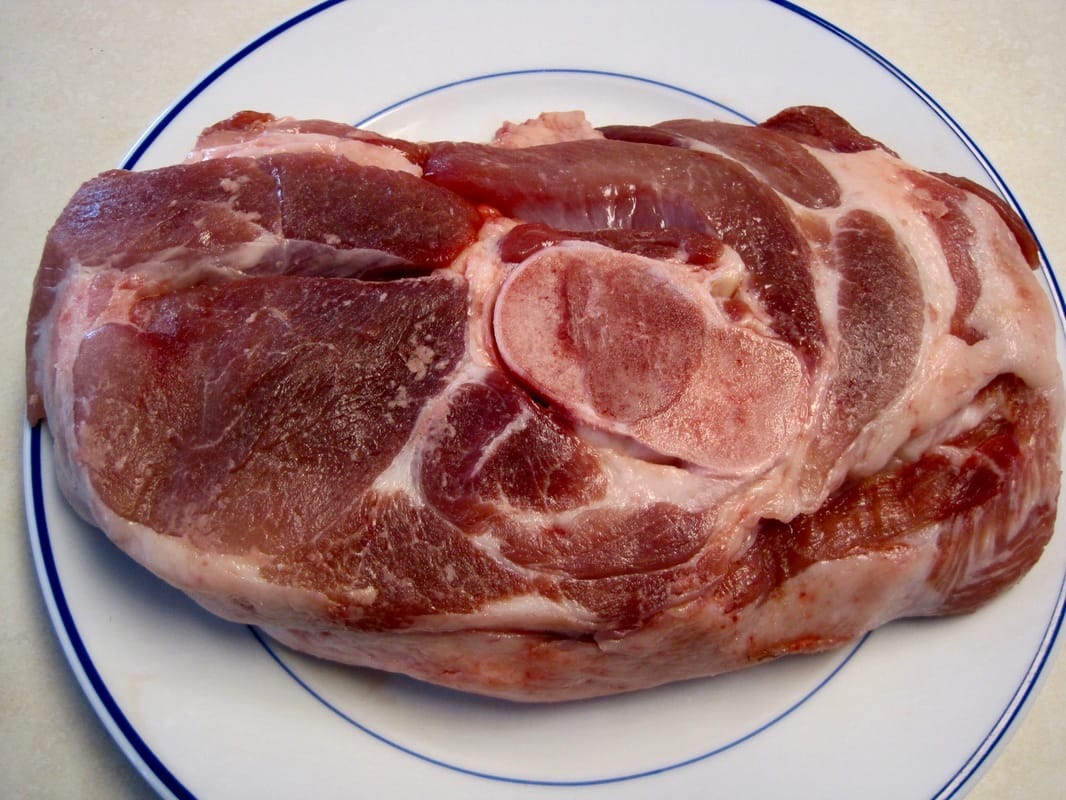
Family Farm Defenders works to build “a farmer-controlled and consumer-oriented food and fiber system, based upon democratically controlled institutions that empower farmers…” John Kinsman was an organic, grass-based Wisconsin dairy farmer, founder of Family Farm Defenders, and a longtime champion of food sovereignty. To qualify, the nominee must be: -Be engaged in his or her own farm for less than five years -A small-scale livestock and/or vegetable and/or fruit producer -Market products locally -Practice sustainable management of natural resources -Promote healthy soil -Conserve biodiversity -Support the Food Sovereignty Principles I knew about Family Farm Defenders, but I hadn’t hadn’t heard of their beginning farmer prize until I received the nomination in the mail. Nominees must fill out a detailed application explaining how they meet the award criteria and the food sovereignty principles. Just going through the questions forces me to think in more detail about where my farm fits in my community. I don’t know who nominated me. I do what I do because I believe in it and it matters to me. There are days though when I wonder if anyone beyond a small circle of family and friends really cares. When the barn is dark and the pastures and woods lay silent under snow, it’s nice to get something like this —that little boost from the outside that says, “Keep going. We think you’re on the right track.” —A recipe and a few explanations with no apologies for being cheeky. Thanks to the cut’s name, I’ve had several questions and a few teases about “pork butt”. It’s actually part of the shoulder, i.e., the front leg. The entire piece can be described as the shoulder. The upper part, near the blade—flat bone—is called the butt, and the lower part, around the shank —round bone—is the shoulder. The cut is also called Boston butt. Why a pork cut sounds like the derriere of a Patriots fan, I don’t know. Why not Green Bay butt? At least that football team's name originates from a bunch of burly meat cutters. The term butt goes back to Middle English, where it refers to the broadest part of something, such as the butt end of a log (the flare near the ground) and later, the butt stock of a rifle (the wide part that you place in your shoulder. ). Hence the term later became slang for the widest part of some people (often in front of me at the Farm & Fleet checkout. See reference to Green Bay butt). This recipe for pork stew with fennel, orange, and olives comes from "vvvanessa" on Food 52. I substituted pork butt—which you can do with almost any pork shoulder recipe (at least I haven't found one yet that doesn't work). Start by cutting the meat into 1" cubes. If possible, take a cue from the woodworking world and make your lengthwise cuts first and then cut those pieces into smaller chunks. It saves you knife (or saw) strokes. 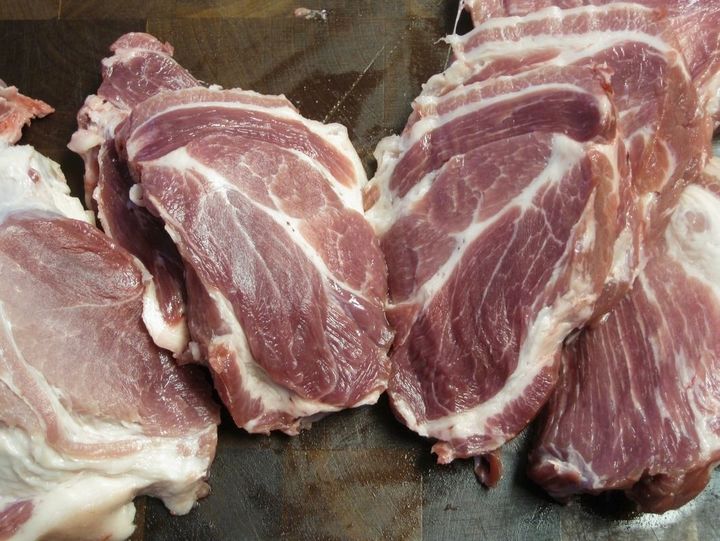 I violated the above advice about long cuts first because I wanted to see a cross section of the roast. Red. Marbled. Yum. A few notes:
The author serves it over polenta. I served it over rice. I would have preferred polenta, but I hadn’t ground any of my corn into meal yet (I don't hand-harvest heirloom varieties of open-pollinated corn just to feed it to hogs. I finally ground some a few days after making this recipe. Wonderful smell and flavor in the cornbread, but that's another post.) I left out the celery and bay leaf because I didn't have them on hand. I used extra fennel, which I prefer to celery. Can't say I missed the bay leaf. Never have. If anyone can show me a recipe that is definitively changed by the token bay leaf, I'll give you a free pork shoulder or butt. I cooked the stew as low as I could for 90 minutes, turned it off, went to pick up the kids, ran errands, yadda-yadda and then reheated it 90 minutes later. I swear that the rest-and-reheat period makes a difference. I don’t have any pics of the completed recipe. When the kids are hungry and Sarah may or may not be home from work yet, “I should get my camera” isn’t in the front of my mind. It's dinner on the table and soon gone. If you want to know how good it looks and tastes, get some good pork butt (let's just say I know a source) and try it for yourself. (And you too can brag about having the best butt in your kitchen).  An Excited Customer An Excited Customer (The headline is a nod to The Onion and the days when people actually knew the difference between real and fake news. Headline aside, the following story is real —not even the names have not been changed to protect the innocent, the guilty, or the meat spread.) I’ve been in a rut lately—the school-lunch-rut. I don’t care for the packaging or ingredients in all the single-serving whatnots marketed to kids. I feel like we do a much healthier and less expensive lunch with the usual sandwich, homemade snacks, and fruit. Sarah is pretty good about changing up the offerings. I’m less creative but stumbled onto to a hit last week. I make rye bread almost weekly during the winter. Though I started my bread baking years ago with Julia Child—the cookbooks, not the actual person—I drifted away from it after we had kids. I came back to regular bread making after discovering Artisan Bread in Five Minutes A Day by Jeff Hertzberg and Zoe Francois. The method gives you fast and simple free-form loaves. No mixing bowl or loaf pans to clean up. The other upshot—our kids love homemade bread. They prefer homemade rye bread for their sandwiches whether it’s PB&J, ham (thick slices from leftovers), or the most recent offering. I was spreading braunschweiger (a.k.a liverwurst) on rye heals for my own afternoon snack last week when the kids asked for some. That’s nothing new, but then Hazel asked, “Can we take braunschweiger on rye for lunch tomorrow?” “You sure you want it for lunch?” I asked. Sometimes they make outlandish requests just to test the waters, like “can we have a fireman’s pole in the barn loft?” (For the record, I’m not against it, but suggested that we wait until they are older.) “Do you want braunschweiger on rye for lunch tomorrow?” I asked Karsten. I don’t like making separate kinds of sandwiches for each of them. “I’d love some,” he said, totally straight-faced. He can be so serious in his own oddities. Where does he get that? 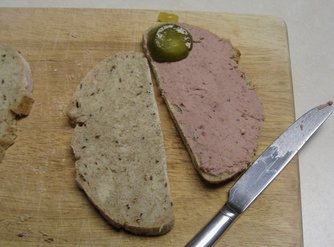 The Meat of the Matter I made their braunschweiger on rye the next morning, putting the wrapped sandwiches next to ice packs and placing a couple homemade pickle slices in a separate container. Hazel beamed like I’d packed a cupcake.
They didn’t leave any leftovers in their sandwich wrappers. “What did your friends think?” I asked. “Jerome was totally grossed out,” Karsten said. “So were Iris and Evan,” Hazel blurted out. Like they were surprised to get similar reactions. Following her own tastes over peer pressure, Hazel proudly took the same thing the following day. I don’t know if it was the taste, the novelty, or the status, but she keeps asking for braunschweiger on rye. It will remain the rare treat, but I’m glad to have made a lunch that they loved. I don’t expect anyone else to send liverwurst in their kids’ lunch. Kids don’t have the same palettes as most adults, but if they are exposed to good food, they tend to develop a preference for it over time. My kids can taste the difference between our summer eggs and “store bought”. That’s not data, it’s just an anecdote, but it’s a good one. Note and Food Tip: We don’t actually eat braunschweiger that often. When I thaw a pound, I cut it in thirds and freeze the other two thirds in separate pyrex containers. Otherwise, a pound can go bad in the fridge before I get to it. 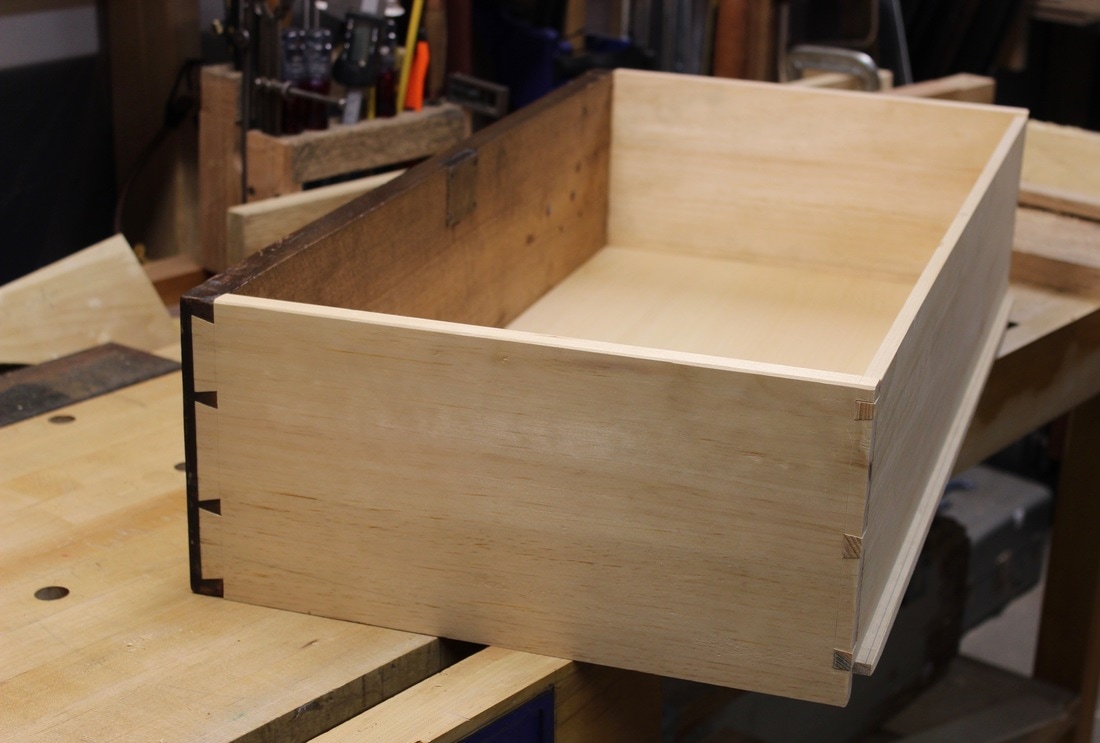 I’m looking over my system for raising hogs. Aside from wanting to carry them a little longer to put more fat (flavor) into them, I’m pretty happy with the end product. My animals live a high-quality, low-stress life as part of a process that builds soil. If I can get those outcomes with less labor, all the better. But how?
Friends and family have suggested that it’s time for a tractor. I’m not ready to go there. It’s not that I harbor some horseless-Amish fantasy. I love working with tractors and machines. I like spending enough time in the seat to get a feel for a machine, to understand it enough to finesse the controls. That goes whether it’s a modern, GPS guided, fully programable, Infinite Variable Transmission John Deere or a 1926 Caterpillar 60. I don’t have a machine aversion. I have debt aversion. I hate the idea of spending money on something that may not actually improve the business —the quality of the end product or the costs/labor of producing it. I’ve done that with tools—think I need something only to discover that, with a little more knowledge and skill—I could get by without it. If the goal is producing the highest quality pastured pork while continually improving the farm’s ecology, then a tractor might not be the next step. It might look like I’m backing myself into a corner. Maybe. But I know this corner. It offers some perspective. Moving from our leased Watertown farm to Madison several years ago forced me into a shop space so small that I put my planer, router, and table saw in storage. I was already interested in hand-tool working, but taking most of my machines out of play (I still had my drill press and small bandsaw) nudged me farther down that path. In time, I got better at squaring and flattening boards with planes. I taught myself how to sharpen handsaws and got better at cutting straight and to the line. Now I can cut respectable tenons and dovetails by hand. Even with my table saw set up in the barn loft now (where I store lumber), I still use handsaws when one or two simple cuts by hand is much faster than dragging a circular saw and cord around or setting up a machine. Sometimes, the older, simpler methods—with requisite skill—beat the modern solutions. I also know that focusing on machines might obscure a better, simpler answer: In the early 90’s, when my dad transitioned from raising grain-fed to grass-fed beef, we started stockpiling round bales for winter feed. In the field, we loaded bales onto a flatbed trailer with the front-end loader. Sometimes, we’d borrow a second loader tractor to unload near the winter pasture. Otherwise, we just pushed bales off the trailer by hand, leaving a scattered mess for us to sort out with our loader tractor once all the bales were out of the field. Dad and I wrestled with finding more efficient ways to move bales from hayfield to winter stockpile. We dreamed up a bale stacker/transporter. We’d take an old school bus, remove the body, and build a hydraulic arm at the right front. The arm would load bales onto the left or right side of a tube-framed bed where manure-spreader type paddle-chains, just below the tube rails on each side of the bed, would progressively move the bales back as more were stacked up front. We figured we could get six bales per side for a twelve-bale load. The transporter could move down the road at fifty miles per hour. At the stockpiling site, the bed would tilt back from a pivot point just behind the rear axle so that it wouldn’t take much tilt for the rear of the bed to almost touch the ground. Then, the driver could ease the truck forward while the paddle chains slid the bales into two tight rows on the ground. We figured that one machine and operator could replace two tractors, a truck and trailer, and three operators. Brilliant. Thankfully, we never built it. The goal was feeding grass-fed beef. Instead of improving our bale-handling, Dad got better at pasture management and rotational grazing, which achieved the end goal while reducing the number of bales needed (and our desire for a transporter). With those lessons in mind, I’m trying to think inside-the-box. Instead of going too far down the build, buy, and modify path, I’m staying minimalist for now, trading labor for less debt. The answers are probably in front of me. Like my hand-tool work, I’ll become even more efficient in how I work. If I stay focused on the end product, I might find smarter ways to cut my labor that I wouldn’t have found from a tractor seat. There's a tremendous sense of satisfaction in discovering that you already have everything you need right in front of you. I’m looking. One trade off for burning less petroleum fuel in my work is that I burn calories like mad. I work hard to eat well but have to eat well to keep working hard.
Several years ago when we still lived in Seattle, I was training for a three-day-run around Mt Ranier (96 miles) and working as a carpenter. Having a physical job (where I biked to work sites in the city) combined with high-mileage training made it hard to get enough calories. I was eating all the time and still hungry every two hours. I could pack away plenty of rich, home-cooked food during meals, but that wasn’t enough; I needed high-energy snacks. Eating handfuls of nuts and hard-boiled eggs worked well enough but I finally gave in and started eating two Cliff bars a day at work as well as eating them while running (part of endurance training is learning to eat while running). I quickly got sick of the cost and taste of Cliff bars. I thought, “Screw Cliff. If I can make my own yogurt, bread, and polenta, I can make my own energy bars.” The below recipe is a modification of one that my mother-in-law sent to me back then. The original version used used corn syrup and peanut butter. I was sick of peanuts and peanut butter so I came up with this version. Ingredients: 1/2 cup low-salt almonds 1/2 cup dried apricots 1/2 cup dried cranberries 3 cups rolled oats 1 1/2 cups of puffed rice 1/4 cup wheat germ 2 Tbs vanilla protein powder 1/2 cup packed brown sugar 3/4 cup Brown rice syrup 3/4 cup Almond butter I buy the oats and puffed rice in bulk. The rice is much smaller and better tasting than Rice Crispies. Get the biggest bowl you own. This is a sloppy mixing process and you will want something with plenty of volume. I chop the first three ingredients in the small cup of a food processor. I usually prefer knife work to gadetry, but the food processor is the cleanest and fastest method for this task. Start with the nuts. I chop the snot out of them –until the biggest ones are 1/8” (half the size of a pencil eraser). Then, add the apricots and cranberries and chop them until it looks like a gummi-bear massacre. It's easier to chop the dried fruit following the nuts since the leftover dust from the nuts cuts down on the stickiness factor. Dump that into the bowl along with the rest of the dried ingredients and mix them together. Get a 9×13 pan and oil it slightly (I used canola oil). Put the syrup, sugar, and almond butter in a small saucepan on low heat. I measure the syrup and almond butter in an oiled measuring cup so I can get the stuff back out again. Stir those three ingredients together in the sauce pan until it starts to bubble a little. You have to keep an eye on it and keep stirring from start to finish. You don’t want to deal with overcooked sugar –not fun. Dump the hot mix into the bowl of dry ingredients, trying to keep the sticky mix surrounded by dry stuff. This requires creative mixing but will also make clean up much easier. You will only get so far stirring the goo and dry stuff together. Hand mixing –the Julia Child both-hands-in-the-bowl-way- is the best method to thoroughly combine all the ingredients evenly. Otherwise, it looks like there is not enough syrup to bind the dry ingredients together. Once the syrup is cool enough, oil your hands and start mixing (doing this when the syrup is still hot will make you say "the sweariest of swears," as Karsten describes a certain word, since what is burning you is also suck to your skin. Experience, you are an effective teacher). I make a sticky ball, trying to get it to pick up the dry ingredients. Then, I break the ball apart and pick up more dry stuff with the stickier insides, mash it all together and repeat until I have one big ball of material and almost no leftover crumbs. Place the ball into the pan and smash it to fit. The mix will still be easily molded at this stage. Let it sit in the pan for about an hour and then either turn the pan over and plop the mold onto a cutting board. I use a French knife to divide the sheet 3 x 4 to get 12 bars. You can go smaller if you like. You can wrap them in wax paper, butcher paper, or use small baggies. I reuse the wrappers because I’m cheap like that. When I calculated the ingredient list and divided the total calories by 12, I got 300 calories per bar. I came up with Almond-Crapricot bars (I don’t fear any corporate theft of my flavor name) to avoid buying and eating so much processed “energy bars”. Now, with kids in school, the overwhelming glut of junk food masquerading as healthy snacks in single-serving packs drives me nuts. We have some of those things, but I prefer to save that stuff for road trips, occasional school snacks, and other eat-on-the-move moments. If we’re at home, we rarely eat snacks that come in individual wrappers. We eat plenty of fruit, homemade yogurt, muffins, etc. I’m going to start making homemade energy bars again for myself and see what the kids think of them. I’m still catching up from last year. I have electric fence I need to pull because I hadn’t built a hand-crank roller for steel fence wire yet when the sudden weather shift froze my posts in the ground. I have a little bit of corn left to hand pick. I need to organize my workspaces so I spend less time getting to tools. I still have pork to sell. But I can’t let the backlog of overdue to-do’s impede planning for the coming season. Within ninety days, I need to have my next field and pasture layouts finalized, have cover crop seeds on hand —if not already sown, and have the first batch of pigs ordered and on their way. Like warfighting, I can’t let myself get so bogged down in the immediate targets that I lose sight of the bigger picture. I do a lot of my planning while staring at a farm map. Spreadsheets and lists galore cover my virtual desktop and desk, but data can be slippery to recall when I walk the ground; images stick with me. As a Marine infantry officer, I lived by maps—spent hours pouring over satellite imagery to plan operations. The more time I spent at the map, the easier it was to adapt to changing situations once we were on the ground. Even when we worked the same area for a few months, I’d still stare at the giant wall map in our Combat Operations Center, visualizing my platoons’ patrol bases, looking at patterns of enemy activity, trying to see what we had missed, developing the next plan, wondering how to do this better. Ten years later and a third of the globe’s spin away, I realize that the way I thought about fighting influences the way I think about farming.  The "Fallujah Peninsula" -a world away in so many ways. In the military, we talk about “setting conditions” with operations that facilitate achieving the larger mission. A focus on setting conditions defined my company’s experience in Iraq. Our constant patrols denied the insurgents the freedom to operate (crooks don’t rob the gas station when the cops are there), but that security would have been short lived (like weeding) had we not been focused on larger, longer-term goals. Our patrolling style emphasized Marines’ daily interactions with the locals—getting to know them and treating them with respect— which set the conditions for Iraqis to begin trusting us. That budding trust allowed us to begin working with the tribal sheiks. Instead of controlling everything ourselves, we worked through the sheiks (empowerment), providing funding, training, and weapons to their local security forces (picked by them, vetted by us). That set the conditions for Iraqis to take responsibility for their own security and root out insurgents by combining their local knowledge with our military support. It worked far better than we had even hoped. (I’m strictly speaking about 3rd Battalion, 6th Marines’ deployment from January to August of 2007 in the rural villages between Fallujah and Ramadi.) My role in all of this was setting an attitude and outlook for the company, pushing decision-making to the squad level, and being on the ground as much as possible, observing, learning, and tying events to the bigger picture while often staying out of the way to let Marines do their jobs. What’s that have to do with farming? I’m not some all-knowing overseer and builder who takes raw materials from plant and animal and hands you a finished product. I’m a facilitator, a student trying to work in partnership with nature. I raise pigs, but the pigs do the growing themselves. I set the best conditions for the pigs to grow well by letting them live truest to their nature— grazing, rooting, playing, and eating in the lowest stress, most humane environment I can create. I build soil, but it’s the microbes that do the work. I plant cover crops and look for the best ways to manage those crops and the animals on them to support the microbial life. I manage the woods, but it’s the oaks and hickories that provide the food, shade, and shelter to livestock and wildlife, that filter our air, and provide lumber and firewood at the end of their life cycle. I try to set the conditions for the trees to do their job better by thinning crowded stands and propagating new ones so the trees will be healthier, more productive, and last well beyond my lifetime. 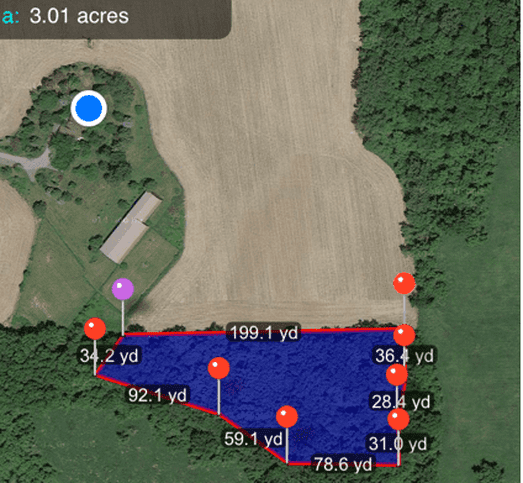 Fence line perimeter for 2016's woods finishing paddock (imagery from the year before I started farming here). I bring bring a certain outlook, provide the labor, and keep looking for better ways to let nature do its job. Plan, set things in motion, and sometimes get out of the way and observe. I look over the top of my screen and out the window at harvested corn and snow-covered pasture. Then I look down at the farm map, developing the next plan, wondering how to do this better.
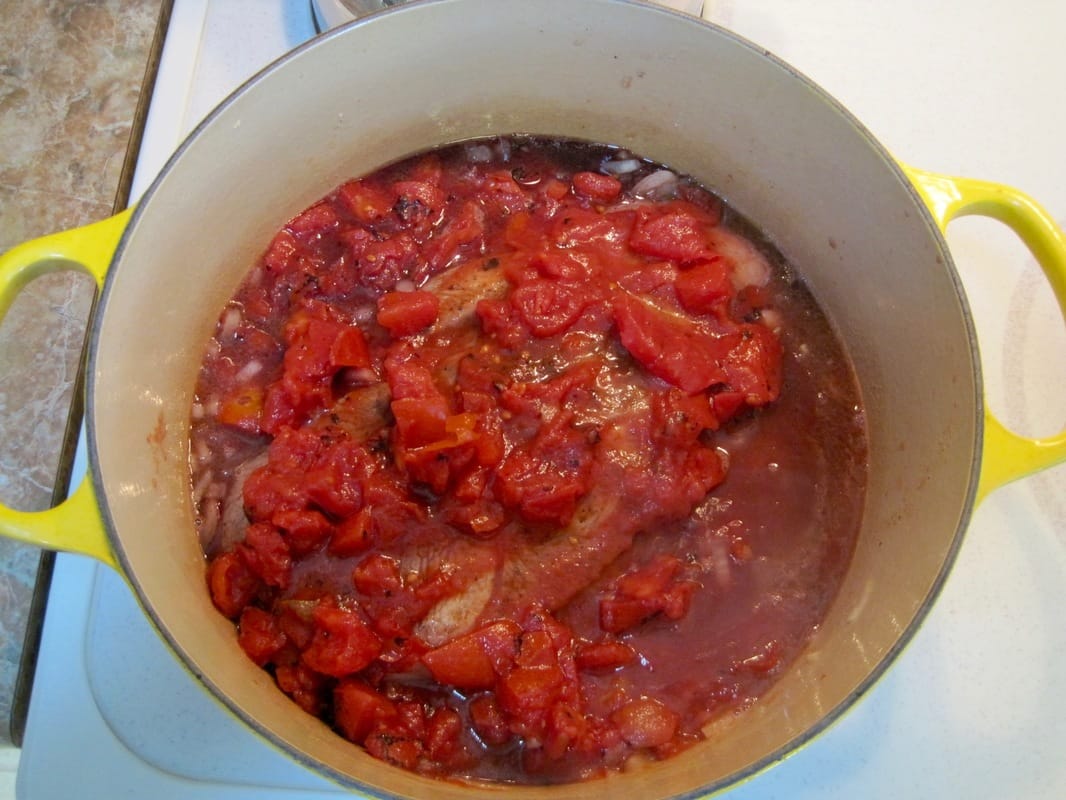
This time of year, when I’m not working outside all day, I like to prep dinner in the late morning/early afternoon, chuck it in the oven, and forget about it for a few hours. This front-loads the work when the kids are a) still at school, or b) home but able to play without the decisive dad ref-ing that seems most in demand near the dinner hour. Then, when darkness falls so early in the evening and we all want to hunker down in front of the fireplace, a warm, hearty meal isn’t too far away. When I asked Sarah for suggestions for a good pork shoulder recipe, she pointed me to Jenny Rosenstrach’s Dinner -A Love Story. Jenny’s Pork Shoulder Ragu with Pappardelle makes a wonderful winter meal. The recipe calls for 2-2-1/2 lbs of pork shoulder. Since I had a 3-1/2 lb shoulder, I diced up a softball-sized onion, and topped the meat with plenty of wine. That’s the beauty of braising —you add enough liquid to keep the meat moist and it’s hard to screw up. I put everything in the oven, and then made lunch for the kids. Recipe here Three hours later, I pulled the roast and let cool in to pot on the stovetop. The recipe has you pull shredding the meat with two forks while it’s still hot, but if you want juicier pork, let the meat cool enough to touch it and it will absorb more of the liquid. I prefer to shred the meat (it mostly falls apart on its own) and let it sit in the liquid for a while before serving. Dishes like this are even better if you refrigerate them overnight and reheat them to eat the next day. At 5 pm, I put on water on to boil for pasta and warmed up the meat—still in the pot—on the stove. It’s not often that I impress my wife and kids with my cooking, but this dish got compliments all around. Our son, Karsten, has two smiles—the I’m-completely-full-of-it-but-let’s-all-pretend-I’m-not smile and the earnest smile. He’s also our family’s picky eater (this is relative, my kids eat braunschweiger). “Dad, this isn’t good,” he said, pausing with the facetious smile. “This is fabulous.” Fabulous was a little over-the-top, but he kept nodding with the earnest smile. When we moved here, several people told me I’d have to get a junker truck with a plow, a tractor, or a four-wheeler with a blade to clear the 250-yard-long lane. Slapping down a thousand or several thousand dollars just to have something that moved snow seems ridiculous. I figured I’d try to adapt what I already have —the humble BCS walk-behind “tractor”. I already have a snowblower attachment for the BCS, a 30+ year-old Mainline single-stage that is so over-built it will hurl chunks of broken bricks and concrete blocks without stopping (and a slight bend in the auger that took some serious whacks from a 6 lb sledge to straighten. I no longer pile rocks and bricks next to fence posts near driveways though). Though the Mainline will eat through eighteen-inch-deep, wind-packed snow easily, it’s too narrow and slow for light snows. Earth Tools in Kentucky sells snow blades for these machines, but I didn’t want to dump $600 for a blade and then find out that I didn’t like it. Instead, I built one from ATV plow purchased through Craigslist for just over $100. I can’t adjust the side-to-side angle from behind the handle bars like the blades from Earth Tools, but that hasn’t been a big drawback. Thanks to our recent weather, I’ve been able to test the plow twice. I can blade the full width of the lane in minutes and keep warm (because I run behind it in the "transport" gear). A truck plow would eat my rig for lunch, and a four-wheeler with the same (50” Moose Plow) blade will push more snow before losing traction. However, for my time, money, and work style, I’m happy with it. (Video on the Odyssey Farm Facebook Page) For anyone interested in the details of making a diesel walk-behind tractor push snow: -5w-40 synthetic engine oil —the same stuff I use in our VW Golf TDI— it flows better in cold temperatures. -Block heater: I put a 500-watt halogen work light under the engine for half an hour, warming up the entire bottom of the crankcase. It starts easily and is ready to work. -Winter Fuel: Standard #2 Diesel will gel below 15 degrees Fahrenheit. Filling stations switch over to a lighter winter fuel mix as soon as the temperature drops. In a pinch you can mix a little Kerosene in the tank. You don’t need much. Better to buy winter fuel, though. -Weights and tires: The main limits of two-wheeled tractors are weight and traction, so I adapted mine to maximize both. I run 27” tall hay rake tires for extra clearance and ground speed. I made axles from 1” keyed shaft so I could quickly change my tread width for different tasks, easily swap tires sizes, and use the older 1” plate weights for wheel weights. The axles allow me to hang up to 100 lbs of weights for each wheel. The tractor and blade also have weight brackets that allow me to find the perfect ballast and balance point for each implement and task. The picture shows 35 lbs on the blade. I’m now running 45lbs there. As it’s currently outfitted, my tractor has 75 lbs on each wheel and 45lbs on the blade for 195 lbs total. I could go up to 250 lbs easily if I felt I needed it. I run the tires at 5 psi so they flex and “bite”. -Speed: The larger BCS tractors have a “transport” gear. Though it’s technically only for use with a cart or sulky, 4th gear lets me move the machine from point to point at a comfortably fast walk while the engine is barely above idle—saving me fuel and time. I run behind the machine to mow pastures with the 44” sickle bar mower (cuts like a giant set of hair clippers) at about 5-6 MPH. Running at 5-6 MPH clears 4-5” of fluffy snow from the lane pretty quickly. 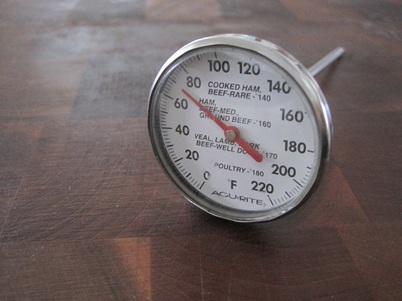 “I hated pork chops as a kid,” a friend told me. “We’d have them once a month,” she said. “They were so dry, my jaws hurt by the end of dinner.”
“But you eat pork now,” I said. “What changed?” “I don’t cook it like my mother did.” I’ve heard several stories like this from several customers whose mothers cooked pork to a second death. They had their reasons. People our parents’ age and older grew up with their mothers overcooking pork to make sure they killed Trichinella spiralis, the pathogen that causes Trichinosis. Though Trichinella spiralis has been mostly eliminated from pork for a few decades in the US (to the tune of 1 case per 54 million for retail pork), overcooking has persisted. Only a few years ago, the USDA finally lowered their cooking temperature recommendations for pork. For cuts (its higher for ground meats), that internal temperature is a nice, easy 145˚ that leaves meat juicy, with some color in the center. USDA Safe Minimum Internal Temperature Recommendations Link For “low and slow” cooking in dutch ovens and crock pots, we don't have to worry to much about drying out the pork. Want to be sure? Especially for grilling? Get a meat thermometer. The thermometer pictured works well for me since the face is large enough to read easily and small enough to use on a steak or chop still on the grill (note that it has the older, higher cooking temperature recommendations on it). To get an accurate reading, you need to make sure the probe reaches the center of the meat. I pick one cut on the grill and probe through the side. That ensures maximum contact from meat to probe so the thermometer is giving you the temperature of the meat, and not just the temperature of the thermometer. (Thermometers are notorious at giving you their temperature and not the temperature of the medium you are measuring. Self-centered things…) If you are grilling, brining is another good way to keep pork juicy. Meat soaked in a brine will absorb the salty solution, and all the other flavors in it, through osmosis until the salt level in the meat and the solution reach equilibrium. This absorption gives meat a higher liquid content before cooking and protects it from drying out as easily. I didn’t go to this recipe because I was afraid of drying my chops out; I wanted the brine to carry the bourbon in. (You are not surprised). While the charcoal grill only comes out in summer or for smoking meats, we use the gas grill year around. I made the below recipe from Steven Raichlen over the weekend. He has you smoke the meat for the last ten minutes. I skipped the smoking part and they were still delicious. Bourbon Brined Pork Chops: 4 Loin Chops (he says 1” thick but I like 3/4” chops) 1 small onion 2 bay leaves 1 cinnamon stick 10 black peppercorns (I used 12 -I’m sure that threw everything off) 5 allspice berries (Couldn’t find them. I’ve made it with and without them. Not a deal-breaker. Come to think of it, I didn’t use the bay leaves either. They pop up in recipes everywhere and I’ve never found them to be a critical ingredient.) 3 cloves 3 Tablespoons of Brown Sugar 3 tablespoons of coarse salt 1 cup of hot water 2 cups of cold water 3 tablespoons of bourbon (I used 4. You are not surprised.) Place the chops in a baking dish large enough that they all lay flat. The ideal dish has just enough room for the chops and is deep enough that they are completely covered in brine. That way, you don’t have to bother turning them once while they brine. Arrange the onions and the next five ingredients (whichever ones you choose to use) over the chops. The Brine: Combine the brown sugar and salt in a large bowl. Add the hot water and whisk until the salt and sugar dissolve. Stir in the cold water and the bourbon. Pour over the chops and refrigerate 2-4 hours. Grilling: Once your grill is warmed up, place the chops on the grates so they are not directly over a burner. You don’t want direct heat at the beginning. The actual recipe calls for smoking the chops first and then transferring them to the hotter part of the grill for the last few minutes. Grill the chops on both sides for several minutes, and then move them directly over the burners. I can’t give you an exact time. Your grill isn’t my grill and your chops might be thinner or thicker than mine. This is why you have a meat thermometer. When the internal temperature reaches 145˚, pull them. Rest: When you pull meat from the grill, let it rest. I’ve read and heard that resting meat after cooking allows the juices that have been driven to the center of the meat to come back out to the edges. Not exactly. It’s actually about temperature. As meat cools slightly after cooking, the muscle fibers relax slightly and can hold more moisture than they could at higher temperature. (The sizzling when you cook meat is the juices being driven out of the meat.) Juices run out of a chop or steak if you cut into it straight off the grill. Let it cool a few degrees and the meat will be able to hold more of the juices within the fibers. If you want to test this to a noticeable level, cut into one chop (or steak or whatever) straight off the grill and let another one rest until it’s almost room temperature. Juices won’t run out of the cooled one. Try it. Even without smoking, there is a slightly smoky flavor to the meat thanks to the bourbon. I cooked four chops for the four of us—40+ ounces of meat for two adults and two six-year-olds. There wasn't anything left on the bones when we finished. |
Ryan Erisman
Former Marine Infantry Officer. Iraq Vet. Interested in Regenerative Agriculture at any scale. Archives
February 2023
Categories
All
|
Odyssey Farm, LLC.
The Odyssey Farm Journal

 RSS Feed
Odyssey Farm, LLC
|
Dane County Climate Champion
|
608.616.9786
|
Copyright © 2016